How to Use Adobe Lightroom for Editing Stunning Photos

Adobe Lightroom is one of the best photo editing tools available for photographers at all levels. Whether you’re a beginner or a seasoned pro, Lightroom gives you everything you need to edit and enhance your photos. With its powerful features and user-friendly interface, Lightroom has become the go-to tool for many professionals in the photography world. From basic adjustments to advanced editing tools, this software helps you bring out the best in your images. In this guide, you’ll learn how to use Lightroom to edit stunning photos like a pro.
Getting Started with Adobe Lightroom
Adobe Lightroom is designed with an intuitive interface, making it accessible for beginners while offering advanced features for professionals. To make the most of it, you need to understand its setup process and navigation. Starting on the right foot ensures a seamless editing experience.
Installing and Setting Up Lightroom
To start using Lightroom, first you need to install it. You can download the software directly from Adobe’s website. Lightroom offers a subscription model, so you’ll need to create an Adobe account to sign up. Once installed, open Lightroom and sign in with your Adobe ID. The program will automatically sync your settings and photos across devices if you’re using the cloud-based subscription.
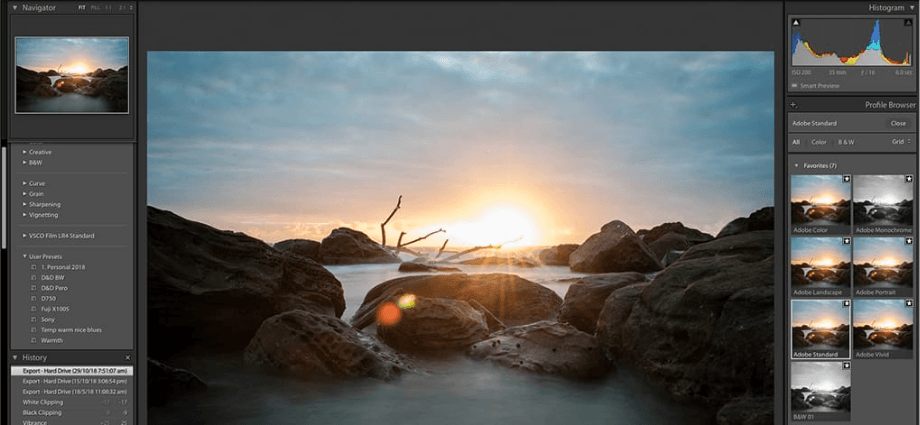
Understanding the Interface
When you open Lightroom, you’ll see a clean and organized workspace with several panels. These include the Navigator, Histogram, Toolbar, and Develop Panel. Understanding these areas will help you navigate Lightroom more efficiently.
Importing Photos to Lightroom
Once you’re set up, it’s time to import your photos. You can import images from your camera or phone directly into Lightroom.
- Click the “Import” button at the bottom left corner to bring in your files.
- Organize your photos into collections, which are like folders, and add keywords to make searching easier later.
Basic Editing Tools in Lightroom
Mastering the foundational tools in Lightroom is crucial for producing stunning photos. These tools allow you to fine-tune brightness, contrast, and color, setting the stage for more advanced edits. A strong grasp of these features can elevate your images significantly.
Exposure and Contrast Adjustments
The first steps in editing your photos in Lightroom usually involve adjusting the exposure and contrast. The Exposure slider controls the overall brightness of your photo, allowing you to lighten or darken the image. Increasing the exposure will make the image brighter, while decreasing it makes it darker. Similarly, adjusting the contrast slider will enhance the difference between light and dark areas, adding depth and visual interest to your image.
Adjusting White Balance
White balance is crucial for accurate color in your photos. Lightroom makes it easy to adjust the temperature and tint sliders.
- The Temperature slider adjusts the warmth or coolness of your photo. Moving it right adds yellow warmth, while moving it left adds a cooler, blue tone.
- The Tint slider helps balance out any color casts, such as green or magenta, to make your image look more natural.
Clarity and Texture Adjustments
To bring out the details in your photos, use the clarity and texture sliders.
- Clarity enhances the midtones and adds sharpness, helping bring out more definition in your photos.
- Texture smooths out or emphasizes fine details in the image, perfect for portraits or landscape shots.
Advanced Editing Features for Stunning Photos
For those looking to refine their edits further, Lightroom’s advanced tools provide exceptional precision. From adjusting tonal curves to enhancing colors, these features allow for creative expression. Dive into these options to take your editing to the next level.
Using the Tone Curve for Precision Control
The Tone curve is a more advanced tool in Lightroom that allows you to fine-tune the brightness and contrast of specific tonal ranges. You can adjust the overall curve or target the shadows, midtones, and highlights separately. By adjusting these, you can achieve more refined control over the tonal balance of your image, allowing you to create dramatic effects or subtle adjustments.
Color Grading and Hue/Saturation Adjustments
Lightroom’s HSL (Hue, Saturation, Luminance) panel lets you target individual colors in your image for adjustment. For example:
- Adjust the hue to change a color’s actual shade (like making blue appear more green).
- Saturation adjusts how vibrant a color is.
- Luminance controls how light or dark a specific color is.
This can be especially useful for enhancing specific colors in portraits or landscapes.
Using the Radial and Graduated Filters
Lightroom offers Radial and Graduated Filters, which allow you to apply edits to specific areas of your photo.
- Radial filters are ideal for drawing attention to a subject by adding focus or softening other areas.
- Graduated filters are perfect for landscapes, allowing you to adjust the exposure of the sky or horizon without affecting the entire photo.
Enhancing Details and Finalizing Your Edits
Finalizing your edits is all about perfecting the details. Tools like sharpening, noise reduction, and spot removal ensure your images look polished and professional. These finishing touches make all the difference in creating visually stunning photos.
Sharpening and Noise Reduction
Once your basic edits are complete, you can add the final touches. Use sharpening to enhance fine details in your image. The Detail Panel offers sliders to sharpen your photo while avoiding oversharpening. You can also use Noise Reduction to remove grain or digital noise from photos taken in low-light conditions, ensuring your final image remains clean and crisp.
Removing Blemishes and Imperfections
If your photo contains unwanted spots or imperfections, Lightroom’s Spot Removal Tool allows you to clone or heal areas of the photo.
- The Clone option duplicates a part of the image to cover blemishes.
- The Heal option blends the affected area with surrounding pixels, making edits look seamless.
This tool is ideal for cleaning up portraits or removing distractions in landscapes.
Adding Vignettes and Final Touches
To draw attention to your subject, you can add a subtle Vignette effect, darkening the edges of your image and keeping the focus centered. Once this is done, make any final tweaks to your sharpness, exposure, or colors to make your image look polished.
Exporting Your Edited Photos
After editing, exporting your photos in the right format is essential for achieving the desired quality. Whether you’re posting online or printing, Lightroom’s export options ensure your images look their best wherever they’re shared.
Choosing the Right Export Settings
After finishing your edits, it’s time to export your photos. Lightroom allows you to export images in various formats, such as JPG, TIFF, and PNG.
- Social media: Export images as JPG at 1080px for best quality.
- Print: For prints, export in TIFF format at a higher resolution to ensure the image remains sharp.
It’s important to choose the right export settings based on how you intend to use the photo.
Saving Presets for Future Edits
One of Lightroom’s most powerful features is its ability to save presets. Presets are collections of editing adjustments that you can apply to other photos with just one click. This is especially useful for creating a consistent editing style across multiple images or speeding up your workflow.
Conclusion
Adobe Lightroom is an incredibly powerful tool for editing photos, whether you’re working with portraits, landscapes, or any other type of photography. By mastering the basics and learning how to use more advanced features, you can transform your images into stunning works of art. Practice with these tools, and soon you’ll be editing photos like a pro.
Share this content: