How to Replace Filters on Honeywell Air Purifiers
Replacing the filters on your Honeywell air purifier is crucial for maintaining its efficiency and ensuring good air quality. Regular filter replacement helps the purifier function effectively, providing clean air for your home. This guide will walk you through the steps to replace filters on Honeywell air purifiers.
Identifying Filter Types
Knowing the type of filter your Honeywell air purifier uses is the first step in the replacement process. Different models may use different filters, so it’s important to identify the correct type.
Understanding Filter Types
Honeywell air purifiers typically use a combination of HEPA filters, carbon filters, and pre-filters. HEPA filters capture fine particles such as dust and allergens, carbon filters remove odors and gases, and pre-filters capture larger particles like pet hair.
- HEPA filters: Capture fine particles
- Carbon filters: Remove odors and gases
- Pre-filters: Capture larger particles
Understanding the role of each filter type helps you know when and why to replace them.
Locating Filter Model Number
To find the correct replacement filter, you need to locate the filter model number on your air purifier. This number is usually printed on the filter itself or listed in the user manual. Check the label on the unit or the packaging for the model number. Identifying the model number ensures you purchase the correct replacement filter.
Purchasing Replacement Filters
When buying replacement filters, ensure you purchase the correct type for your Honeywell air purifier. It’s best to buy from authorized dealers or reputable online stores to avoid counterfeit products. Verify the compatibility of the filters with your specific model to ensure they fit and function correctly.
Preparing for Filter Replacement
Before replacing the filters, there are a few preparatory steps to ensure safety and efficiency. Proper preparation makes the replacement process smoother and prevents any mishaps.
Proper preparation is key to a smooth and safe filter replacement process.
Safety Precautions
Safety should be your top priority when replacing filters. Start by turning off the air purifier and unplugging it from the power source. This prevents any electrical hazards during the replacement process. Ensuring the unit is completely off helps safeguard against accidental shocks or malfunctions.
Gathering Necessary Tools
Gather all the tools you need for the filter replacement. This may include a screwdriver, pliers, and a clean cloth. Having the necessary tools on hand makes the process more efficient.
- Screwdriver
- Pliers
- Clean cloth
Having the right tools ready ensures a smooth replacement process.
Unplugging the Unit
Unplugging the air purifier is crucial to avoid any electrical hazards. Make sure the unit is completely off before you begin the replacement process. This simple step ensures your safety and protects the air purifier from potential damage.
Replacing the Filters
Replacing the filters involves accessing the filter compartment, removing the old filters, and inserting the new ones. Follow these steps to replace the filters on your Honeywell air purifier.
Replacing the filters properly ensures your air purifier continues to work efficiently.
Accessing the Filter Compartment
To replace the filters, you need to access the filter compartment. This typically involves removing the front or back panel of the air purifier. Refer to the user manual for specific instructions on how to open the filter compartment.
- Remove the front or back panel
- Refer to the user manual
- Access the filter compartment
Accessing the filter compartment allows you to remove the old filters and insert new ones.
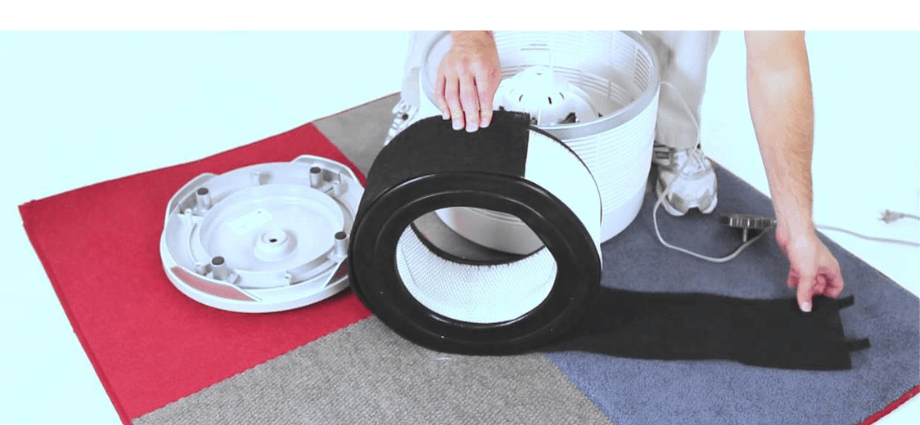
Removing the Old Filters
Carefully remove the old filters from the compartment. Handle the dirty filters with care to avoid spreading dust and debris. Dispose of the old filters properly, following local disposal guidelines. Removing the old filters prepares the air purifier for the new replacements.
Inserting New Filters
Insert the new filters into the filter compartment, ensuring they are placed correctly and securely. Follow the instructions provided with the replacement filters to ensure proper placement.
- Insert new filters into the compartment
- Ensure correct and secure placement
- Follow instructions provided with the filters
Inserting the new filters correctly ensures optimal performance of your air purifier.
Post-Replacement Steps

After replacing the filters, there are a few steps to ensure everything is secure and functioning correctly. These steps help maintain the efficiency and effectiveness of your air purifier.
These post-replacement steps are essential for maintaining your air purifier’s efficiency.
Securing the Filter Compartment
Ensure the filter compartment is properly closed and secured. This prevents any air leaks and ensures the filters function correctly. Check the unit for any loose parts and tighten them as necessary. A securely closed compartment ensures optimal performance.
Testing the Unit
After replacing the filters, test the air purifier to ensure it is functioning correctly. Turn on the unit and check for proper airflow. Listen for any unusual noises that may indicate a problem.
- Turn on the air purifier
- Check for proper airflow
- Listen for unusual noises
Testing the unit ensures the replacement filters are working correctly.
Setting a Replacement Schedule
To maintain the efficiency of your air purifier, set a regular filter replacement schedule. Refer to the user manual for recommended replacement intervals. Mark the dates on your calendar or set reminders to replace the filters regularly. A consistent replacement schedule ensures your air purifier continues to provide clean air.
Conclusion
Regularly replacing the filters on your Honeywell air purifier is essential for maintaining good air quality and ensuring the unit’s efficiency. By following the steps outlined in this guide, you can replace the filters safely and effectively.
Share this content: